How to Decopatch: Hints & Tips
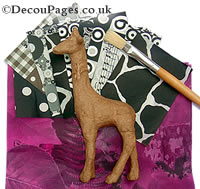
Pick the object you want to decorate. You can decopatch paper mache or MDF blanks specially designed for decopatching. Alternatively you can recycle a wide range of objects. Materials suitable for decopatching include card, wood, ceramic, glass, metal, plastic, wicker and stone.
To be sure you have enough decopaper, you'll need enough paper to wrap the object plus half as much again. e.g. If you can wrap the object in half a sheet of paper make sure you have a total of ¾ of a sheet to complete the object.
It's a good idea to start with a small object for your first attempt. Stick to simple shapes to start with, nothing too fiddly. Boxes, MDF letters and frames are all good choices.
 Make sure it is clean, dry and has a sound surface.
If the object is dark or multicoloured it may affect how the colour of the papers look. You can prime the surface first with white acrylic primer (sometimes called gesso or acrylic gesso). Allow to dry thoroughly.
Cut or tear the Decopatch paper to the required size. Many decopatchers prefer to tear their papers as torn edges blend in better.
For the overlapping patchwork effect that is much favoured you'll probably want the paper pieces to be no larger than a postage stamp, unless you're working on a large object.
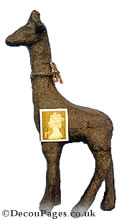
As you can see from the photo, when decopatching any of the extra small animals then you may want tear the decopatch paper a bit smaller than a stamp.
 Brush the glue-varnish on an area slightly larger than the piece of paper you want to stick to the surface.
Having a selection of different size brushes allows you to match the brush to the size of the paper pieces.
Apply the paper to the surface and then brush a layer of glue-varnish over the top of the paper making sure there are no air bubbles. Working from the centre of the paper out to the edges helps give a smooth finish. Remove excess glue-varnish.
You'll soon get adept at picking up the papers and applying them with your brush, so you don't get sticky fingers.
For crisp edges, where the paper stops and doesn't fold over the edge, allow the paper to overlap the edge. When fully dry you can trim with scissors.
A large blob of Blu-Tack is helpful to hold small items while wrapping the Decopatch paper around the edges.
 Repeat the process, slightly overlapping the pieces, until you've achieved the desired effect. Keeping the overlap to a minimum saves on paper and helps give a smooth surface.
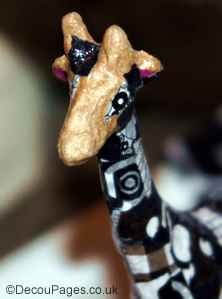
Remember that darker colours can show through lighter coloured papers, so if you plan ahead you can put the lighter coloured areas of paper on first. In the photo the pink accent for the ears was applied first.
Complete the item with any finishing touches such as patchliner (like icing on a cake it gives areas of 3D colour), tresors (mini jewels), high gloss varnish etc.
If the item is not just a decorative item but will be used on a regular basis then add a coat of professional varnish (Aqua Pro).
If your finished item is fully dry and still feels a bit tacky or soft, then coat it with Decopatch varnish.